Tuesday, December 14, 2021

Looks a lot like Christmas!

Hi, Y'all!

Last week we already had Winter wonderland here in our area, and therefore it's time to have a closer look at Christmas decorations! In the last years my colorscheme was mostly white, but our new home bears some black accents (e.g our stairway and the wrought iron handles of the kitchen cabinets), and as the kitchen has some farmhouse vibes I wanted to reflect that rustic style in my decoration. My inner rule was to avoid buying new and diy everything with items which are already existing in my household. Well, I bought one roll of craft paper, some ribbon, three little bottlebrush trees and a slightly larger wooden one. But that's all, really. 

Well, then let the craziness begin... I started with repurposing some of these free magazines which are published in every city, I guess. I had two or three of them, all events were either already over or cancelled due to obvious reasons; therefore I could transform them - at first into tons of thin paper rolls:


These are pretty easy to make, you only need a dowel and some paper glue. After a few of them you'll get into the swing of things and they turn (sic!) out nicely shaped - a little thinner on one end, so you can position one into another. Once they are connected, you can braid or bend them as you like, e.g. into stars: 

Or into a tube (depending on the mold - hairspray can or glue stick - the diameter will be larger or smaller): 

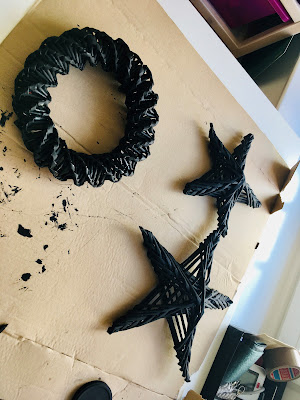
You can connect that tube to a very nice wreath and either let it colorful as is or paint it. Pro tip: take spray paint, otherwise you'll need lots of patience and chocolates :) 


The whole project was intended for our apartment door. These suction cup hooks never work for me, and of course I didn't want to use thumbtacks on our door, thus I took advantage of counterbalance. Which means I connected wreath and stars with some nice ribbon and run that ribbon over the top of our door. Outside you can now see the wreath and inside the two stars. And as the ribbon is very thin the door opens and closes without any problem. Clever, right? 


Let's stay with that color - you may remember the milk carton houses. Sure, I didn't move them, but made new ones - this time in black. 


And now let's appreciate another childhood classic: salt dough. Yes, you can make that stuff fancy - for instance, I rolled the dough and cut it into triangles in different sizes and let them dry. Might have gone faster in the oven, I suppose, but now they have a light salty crust that slightly glitters - I like that! Then I boiled some corks in water which makes them easier to process afterwards (and champagne corks lose their significant shape they're pressed to). I cut a slit and fixed the triangles with hot glue. Et voilà, my little fir forest: 


That simple tree principle can easily be adapted. Here I cut some card stock and wrapped it with yarn: 


To have 3D trees, just form a cone out of card stock and then wrap it in yarn:

Moreover, you can make tassels from the yarn and arrange it like a tree: 


Together with the aformentioned storebought tree the arrangement looks like this: 


Once we're in the fir forest, please find below a simple powerpoint project - just played around with fonts and font size (it's the German version of the song "Oh Christmas tree, oh Christmas tree, btw - and I guess, this is the original): 


Here are some more examples on the minimalistic side - you could perfectly use them as holiday cards, I'd say: 


In connection with the overall concept:


And once again a printed project: 

But let's jump back to the holiday cards... This year ours look like this: 

The stars or wreaths I folded out of an old book with Christmas stories and glued them onto craft paper. And as the book had some more pages left over, I wanted to use them as well. I made quite a nice pile of cones: 


Then I glued them onto a card board circle to form a wreath and put some colorful decoration in the center: 


But besides these book pages I also had some thicker paper in my stash which was perfect for a large star. Basically you make separate segments and cut out a tip. Then you staple all segments next to each other and tie them all together with fishing line. Right now it is hanging in my office window together with some stars folded from white translucent paper, and that looks very, very pretty. 


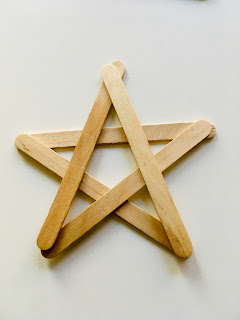
Another star I glued together with popsicle sticks which I painted black. Now it's sitting in my all-black advent wreath - something different and I love it. 


With popsicle sticks you can also make some cute little ornaments to decorate your presents or hang in the tree: 


And last but not least I grabbed my water colors and started doodling around. This is the result and it's placed in a white frame on my office window sill: 

These were all my diy projects - at least regarding decorations. All my Christmas gifts were handmade, too. But you might imagine that I can't show them right now. As compensation a few impressions of our complete holiday decor... 


Fits exactly :-)


Minimalistic nativity scene :-)


Normally our menu :-)


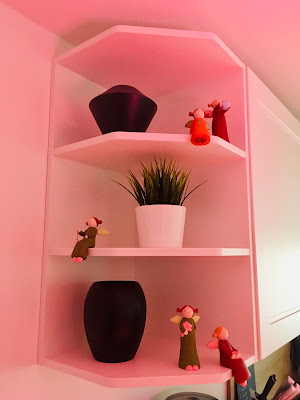
The ideal setting for my Chérubinettes :-)


Of course we can't miss the "exploded hedgehog"!


The individual items itself aren't very over the top with a lot of glitz and bling; they are more simple and minimalistic. But if you have a lot, and I mean A LOT of these minimalistic things, what's it called then - minimax???


On that philosophic note - don't let the hectic in these times eat you up and enjoy that precious time instead! 

Friday, December 3, 2021

'tis the season...

Hi, Y'all!

Thanksgiving just passed (although we're in Germany, we actually like celebrating that holiday). Our neighbors lived in the US for quite some time and therefore it deemed suitable to devour a bird together. With two couples it didn't make sense to prepare a whole turkey, and so we had a duck instead (I bought that via grutto.com - no ad, we paid for it ourselves). I like their principles and whereas we eat mostly vegetarian, we sometimes have something special when there is a special occasion. But let me stress that there are vegetarian or vegan dishes which are equally delicious! 

I stuffed the duck with apples, oranges and onions and spiced it with s+p. Placed it onto a rack and below there was a sheet pan with veggies (carrots, leek, onions, knob celery), the stuffing which didn't fit in the duck, vegetable stock and some spices (a cinnamon stick, star anise, some cloves and a laurel leave). The giblets, the throat and the wings I also placed on that sheet for extra taste. The idea is that all the liquid from the bird is caught in the sheet pan to enhance the taste. It went into the oven for one and a half hours at 150 degrees Celsius, and then I took the liquid from the sheet pan and used it as base for the sauce. I put the oven to 200 degrees Celsius for another half an hour to get the skin especially crispy. For the sauce I caramelized some sugar in a pot and deglazed it with some balsamic vinegar and red wine and reduced until it reached a honey-like texture. I then added the liquid from the sheet pan and a bit of cream, but no thickeners.  

In the heat of the moment I did not take any pictures but here's one from preparation: 


Meanwhile I set the table, and as we are lacking some pendant light above our table, we had three large candles as centerpiece. Thanks Bine for your deco-inspiration with the wine corks :-) 

Dumplings were store-bought, but as compensation I did the red cabbage from scratch. So, first there was the shredding of the cabbage (I am so thankful for my KitchenAid!) and then I had to massage some salt into the cabbage to soften it up. 


Then I caramelized some onions in a dutch oven (because I was afraid that my pot wasn't large enough) and deglazed them with balsamic vinegar. (If you see a pattern here - you are damn right!) 


Add into the mix some apple and orange juice, some water and of course the star of the show, the red cabbage. Furthermore a teabag full of spices, e.g. a laurel leaf, some juniper berries, some cloves and a cinnamon stick. Let that simmer until it is as soft as you like it - and that may take an hour or two. Therefore, I prepared the cabbage in the morning and simply reheated it in the evening, which worked perfectly fine. I was so busy with bird and sauce that I didn't want to bother with homemade dumplings and cabbage. 

When the cabbage was almost done, I added half a glass of mountain cranberries and that's it for the vegetarian version. But hubby aka taste tester deluxe said something's missing. Thus I threw some diced bacon in a pan and fried that until it was crispy. Bacon and fat joined the cabbage, and the combination of fruity and smoky was absolutely delish! Added bonus: the cabbage was beautifully glossy! 

Well, that was end of November, a very nice and yummy evening, and now its advent already... Some things never change - Christmas is just around the corner all of a sudden :-) And therefore I will post some Christmas decorations soon! 

Be thankful and be blessed!

Thursday, November 11, 2021

Fallidays

Hi, Y'all!

I already mentioned the culture clash Halloween vs. St. Martin's Day (Note to self: Get some goodies for the children because they'll come lantern singing tomorrow!) and therefore, I will concentrate on the culinary side of fall. 

And as I already started with Halloween, here is some good and scary stuff I made for our haunted house party:

First, some poisoned potion: (Blue Curacao, canned peaches, Fanta and some bubbly):


With some dry ice this could have a dramatic effect (a few years ago, we had that at a Harry Potter-themed birthday party) but our favorite chemist wasn't in town :-)

Bit of a salty snack: wiener mummys!


And some sweet treat: witch fingers! 


But fall has more to offer than Halloween, and pumpkins can be used for more than soup; a risotto for instance. I diced up a Butternut pumpkin and roasted it in the oven. Then I fried some bacon, added the risotto rice and deglazed it with some vegetable broth (you could use white wine, of course). Before serving, add a healthy dose of sage and parmesan cheese and mix the pumpkin back in. Spritz some Balsamico cream on top and you're good to go!

Another very fally thing is tarte or quiche. And I'm being honest with you guys: Nothing works better than a store bought puff pastry, because in a few minutes your dish is ready to eat. 

For example this pear tarte with goat's cheese and caramelized walnuts, or below one with figs, hazelnuts and camembert cheese:


Another good alternative are vegetable fritters. Here I grated zucchini as a base and mixed them with egg, breadcrumbs and shredded cheese. I made little balls and pressed them on a sheet pan to roast them fatfree in the oven. Side dish of greek joghurt with some herbs and lemon, and the healthy yumminess was ready! 


But you guys know me well - I can't leave this post without some dessert. And so I made cinnamon buns! I guess, they are typical American, but they exist in Germany and in Scandinavia, as well. Thus I prepared a yeast dough and let it rest for quite some time. I rolled it into a large rectangle and brushed a mix of melted butter, sugar and cinnamon onto it. Then I cut strips and rolled them (you could roll the whole dough into a large snake and cut that in slices, too). Put the rolls with the spirals looking up into a casserole dish and let them sit again. Bake it afterwards and coat it with some frosting (I melted white chocolate and mixed it with cream cheese). Of course, you could opt for the classic topping of powdered sugar with lemon juice, that is equally delish. And this is how it looks like: 


But to create some balance between my kitchen and my diy desk, please find below another possibility to recycle old t-shirts. When entering from our loggia into our living room there is a step slighty higher than normal. That was a bit awkward for our dogs, because they jumped down and then slipped on the vinyl floor. To make landing easier for them, I wanted to make a mat. Thus I produced some yarn from worn-out t-shirts and started to crochet a door mat. 


I gave my best but that thing stayed crooked and I did not like that! So I ribbed it apart and started again, this time with my knitting needles: 


Much better. To finish it I sewed an old leather label from a pair of jeans, and now it looks pretty professional and works like a charm: 


Last Sunday we were invited to a birthday and I didn't want to come empty-handed. I already bought some faux leather in gold on our last fabric market in the summer, because you never know... And so I had the perfect material on hand to sew a cute little clutch:


Simple and elegant, with a snap as closure (because I don't like to use magnetic closures - you never know if they might destroy the magnetic strip on credit cards and such). And the tassle is only lightly attached to the snap, thus you can wear the clutch with or without. 

Well, that's it for today - enjoy the fallidays, 'cause advent is just around the corner!