Tuesday, July 28, 2020

Not ready to wear

Hi Y'all!

If clothes didn't fit me properly, I formerly thought I either took the wrong size, chose a cheap brand or simply found a cut not fit for my body. Sometimes I even felt ashamed that I wasn't able to manage the easiest solution for my problem: Just lose weight, and then everything would fit me perfectly. Nowadays I'm older, wiser and more relaxed.  

Of course, finding the correct size is important, and I won't lose any word about fast fashion brands like Primark and so-on. And over time, I got a feeling for my own style, I know what suits me and what doesn't - regardless of dress sizes. Related to standard sewing patterns, my upper body is 4 cm shorter than the average, but my legs are a bit longer, thus I am able to buy normal length pants that don't sweep the floor, although I am far from being a giant. 

Besides, I am totally fine with my waist and belly not being slim; as compensation, my legs are pretty slender. Thus I like wearing dresses which are boxy but short, or skinny-fit pants combined with loose-fitting tops. I don't own jumpsuits, because I would look weird in them even if I'd weigh 25 kg less than now. And never ever would I wear a belt and shorten my torso even more, even if my luxurious diva body would fit into a size 40 (sorry, only German sizing references here). And apart from that: Sizes are only a rough guestimate, if you ask me. Some plus-size-manufacturers write smaller sizes in their garments to make their clients feel better (as if my well-being depended on a number…). Other manufacturers (more on the fast-fashion-side) resize their clothes, that even Twiggy (or Kate Moss for my younger audience) has to chose a size 40 to be able to breathe in it. And I even experienced that pants with the exact same size, fit and model were cut differently, nevertheless. 

My sewing skills improved over the years, and I can proudly say that I made some nice garments for myself (e.g. a softshell jacket and a woolen coat which I both love dearly and wear often), but still I have the greatest respect when it comes to sewing for others. Therefore, I was relieved that hubby ordered some denim pants instead of asking me to sew them for him. Although he was size-wise guided by some well-fitting pants, his first delivery was way too small. When upsizing just one size, the legs were much too long and wide, and he was bummed that he had to buy size x instead of size y (insert whiny noise here). But as it fit nicely around his bum, I urged him to either forget the size or cut the little washing instructions with the imprinted size. There is no use in sending fitting pants back only because you don't like the size tag. The width and length of the legs are easy to change. And it is as it is: There are no people off the shelf, everybody and every body is different. 

Shortening legs of suit trousers is sometimes more, sometimes less complicated. Chinos are pretty easy to shorten, but with denim pants it's completely different because of the characteristic hem - I'm sure you know what I mean. Usually you loose that hem when making the jeans legs shorter and I think that's a shame. We had that even when we purchased at a dedicated jeans shop and asked them to shorten the jeans - you instantly noticed that someone changed the length because the typical hem was gone. Therefore, I tried a new technique (wich I didn't invent, but once I've tried and tested, I can totally recommend). 

First I  cut the above mentioned hem with a seam allowance of 1 cm and then shortened the rest of the leg - bearing in mind the seam allowance and the fact that the original hem will be reattached). Then I placed the hem right sides facing on the leg, with the fraying edges both on one side and the hem pointing to the waistband of the pants (I hope this is clearer on the picture, although it's slightly blurred): 


Then I took a blue thread and sewed directly next to the golden original seam (almost stitch in the ditch). 


Here you hopefully can see that the needle is inserted directly next to the original seam: 


Then I serged it with a zig-zag-stitch as denim frays easily: I


And this is my result:


The hem is kept, but now I have to iron everything. And to keep the seam flat, I glued it to the inside of the leg by using a double-sided adhesive fusible tape-thingy. 


And when it's ironed and turned inside-out, it looks like this: 


Not bad, right? Sure, if you roll up the legs, you will see the seams. But with the right leg length there's no need for rolling up :-)

Therefore, I raise my glass to uniqueness and individuality - cheers!!! 

Wednesday, July 22, 2020

Tataaa!

Hi, y'all!

In case you missed me: My motivation ran away and danced in the streets with a cocktail in her hand… But now everything's fine, I'm back :-) By the way: I may have told you that I streamlined my meal planning, so I only have to buy groceries every three weeks. And this is the haul - even my smart watch counts that as exercise! 


That includes everything from tp to dog food, and from shower gel to chicken breast. The only premises: A freezer, a zero degree (Celsius, of course) department in the fridge and a good handful of common sense. Which means: produce which is turning bad the quickest, will be eaten first, and things which stay good for longer, will be consumed later on. Pizza crusts, pies and burger buns I bake at home, but puff pastry I only have store bought to freeze. Regarding cakes, I usually bake sponge ones, because they freeze well, and sometimes I do them in a flat pan, so I can top them off after defrosting. For example, we had a tangerine and cream cheese topping lately, which was absolutely delicious. Then I usually stock on frozen vegetables e.g. for my spinach lasagna or a veggie curry. Popsicles are a must-have, at least in summer. Normally, I buy the mini versions of the large ones - for most of the times it's enough for my sweet tooth, but if not, we just take two :-) Pasta and rice are classic dry goods which I always have in my pantry, as well as red lentils, canned tomatoes, smoked bacon bits, parmesan and onions. So you can pretty easily toss a risotto, spaghetti Carbonara or vegetarian Bolognese. Canned tuna with sour cream or broccoli with soft cheese make some good pasta sauces, and even Ajvar (a spread from red bell peppers) is a perfect base for a sauce. Potatoes are good choice, too, baked in the oven with garden fresh rosemary and thyme (sorry, no parsley and sage this year…), with some salad and spiced sour cream on the side -simply perfect! Sure, this is no high-end cuisine, but it works well for everyday, it is quick, more or less low-fat and somehow healthy. Mostly vegetarian, but on weekends with meat, often as BBQ, cause it's summer time. And as we speak of summer: That's what we had Monday night for dinner:


And then I told you a few posts ago, that I crocheted some make-up pads which weren't as practical as I hoped them to be. Thus, I ripped them apart, put them into something new adorned with tassels and beads, and they are pretty nice, I think. There are possibilities galore: hanging from a handbag or on a zipper, as key chain, even as pendant or as an embellishment for a present and so on...

But stop talking, here's the deal: 


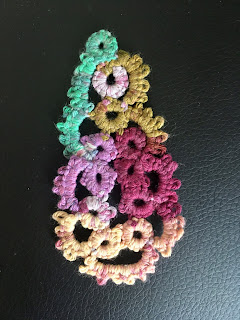
And as you're never too old to learn (it may only take some more time until you understand), I tried a new technique: needle tatting. Sometimes you find it under "Occhi" - sounds pretty Italian but doesn't explain anything :-) In principle, tatting is a form of lace-making, and there a variations with a needle and a shuttle. In lack of a tatting needle, I simply used a large sewing needle with an even larger eye and some leftover cotton yarn. In general, you do some Macramee-like knots on the needle and then you join them to circles or chains. You can put little picots in between as decoration or connecting elements. My conclusion after some playing around: a longer (and less pointy) needle might come in handy, and with some shiny thin yarn you could make some delicate and elegant pieces of jewelry or napkin rings or whatever.

Nevertheless, here are my first attempts on needle tatting:


Update: Here are a few more pendants...


And here is another insight, as it didn't take me too long to get into tatting: 

You can teach an old dog new tricks after all :-)

Stay healthy and creative!


Friday, July 10, 2020

It's all about presentation

Hi, y'all!

Display designer or interior designer can confirm: If you present some items in an extraordinary way, they sell a lot easier. I don't want to sell anything, but I'd like to present something (in some way), because I need a display for my iPad.

My tablet is a gift from hubby and even bears a personal dedication, and therefore, I love it dearly. To protect it from any harm, I sewed a plain cover from cherry red wool fabric and embellished it with some leaf appliqués.

But it needed more than that - I wanted some kind of stand to put the tablet on in order to comfortably watch some videos and whatnot. Sure I could have asked Jeff Bezos to send me a multifunctional cover/stand, but you know how much I like a good diy. And moreover, I already had all my material at home, so the decision was an easy one.  

My well-loved and well-worn black corduroy pants crossed the rainbow bridge, and after grieving I gifted one leg a second life: cut it off, closed the seam on one side, filled it with all heavy dried goods I could find in my pantry (lentils, rice - you name it) and closed the other side. At the back I folded some of the fabric over and fixed it with a large button. This created a tunnel through wich I put my earphones, when I don't need them. On top of the stand is a place for my glasses - which makes it some kind of multifunctional, right?

And this is how the thingy looks: In the first picture you hopefully can see the red wool cover and the glasses in parking position:


In the second picture you can see the button and the earphones. You can also see that the picture is somehow blurred, but I pretend it to be intentionally, because I wanted the focus to be on the cables, and not on the red cover...


And in the third picture you find the iPad stand in its whole glory (well, more or less - I am no photo expert and black corduroy isn't ideal to show some details…) 


But here, you can see the place, where the tablet gets positioned and how it can rest against that pyramid shape. If I'm travelling, I only take the red cover, because due to its' weight the stand has to stay home. But apart from that I really like it.

Have a wonderful weekend and stay safe and healthy!