Hi Y'all!
I'm a big fan of DIY projects which are quick, easy and with a purpose. But sometimes things just happen differently...
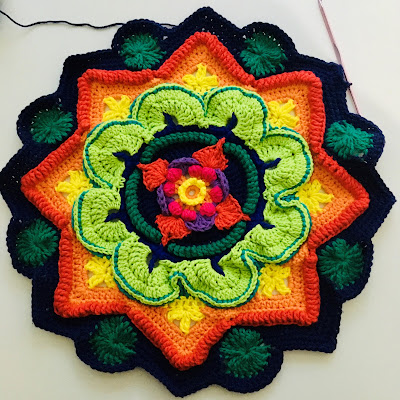
Last winter I had a craving for color (tbh I like color all the time), and therefore a project by #crystalsandcrochet caught my attention - a crocheted mandala, gigantic and a fireworks of color and patterns. I had no idea what to do with such a monster, but I liked it a lot. What shall we do - not with the drunken sailor but with a circular blanket? Might be pretty for a picknick but on the other hand it seemed impractical due to its 3dimensional patterns and stitches. Furthermore, I'd have to coat it with some waterproof fabric.
Wait and see, I ordered to collections of cotton yarn in all colors of the rainbow and soon started crocheting. I was inspired by the pattern for the mandala madness and followed it more or less strictly.
And the experts with an eye for the detail might detect that I already started with a dark grey yarn. That is because I finally decided to square up that blanket, although I made more than enough quilts to keep me warm. But our balcony - which is mostly colored in white, black and copper - could use some pop of color. (And therefore I finish the blanket with grey, haha!) But in fact it ties perfectly with the grey pillows on the windowsill of our balcony (althoug it doesn't look that way on the pictures further below...)
To avoid any boredom, here are some pictures of the details:
But how do I square up a circle? In principle, it's easy: You divide your circle in even eights like a pie and start in the first piece of pie with small stitches like a slip stitch. Slowly you ascend with larger stitches, e.g. single crochet, then half double crochet, double crochet and treble until the end of the pie piece. In the next pie piece you mirror that - which means you start with the large stitches and descend all the way down to the slip stitch at the end of your second pie piece. Repeat that process three times et voilà you have the foundation for your four corners.
With small circles (let's say like the palm of your hand) that's pretty simple, but with that ginourmous beast I had created, it was not so easy. Somehow it stayed rounded instead of a proper square. After two failed attempts I chose another approach and started right in the corner.
I began with a scallop pattern in the middle of two pie pieces and crocheted in rows until the end of the two pieces, and thus I formed one corner. I repeated that for another three times and after that I continued in rows of half double crochets until the ten skeins of grey cotton were almost gone. Sounds incomprehensible? Well, maybe it is :-)
Not a big fan of the scalloped center, because I wanted that grey to be completely plain. But that was the only method to produce straight edges in that square, and then I wanted to get it done finally.
I finished it off with tassles in all four corners which I like very much. And while making them, I added some for the two pillows as well. Looks really pretty and cohesive now.
And that's the ensemble in action - approved by Heinrich himself :-)


